
This recipe for Gluten-Free 5 Ingredient Apple Cider Glazed Pork Tenderloin with Apple Noodles is brought to you because I was part of the Every day, care™ project with Whirlpool® as part of a sponsored post for Socialstars. #EveryDayCare
 Done in just about 30 minutes, this Gluten-Free 5 Ingredient Apple Cider Glazed Pork Tenderloin with Apple Noodles is a huge-on-flavor Fall weeeknight dinner option!
Ever since Olivia has arrived, I'm pretty sure the washer and dryer have been going non-stop. The girl goes through a ridiculous amount of clothes, burp cloths, swaddling blankets, and bibs. It seems like every free moment Asheley has, she's doing laundry and is well on her way to accomplishing her dream goal of becoming a laundry-folding ninja.
I'm so thankful for her. The amount of care she puts in day after day for our baby girl is tremendous. And yes, my baby's momma also stays on top of doing all my laundry. I can't stand doing laundry. Ugh it's the worst... and she's the best.
But that's why we are a great team. We divvy up the chores and responsibilites around here. Her laundry room? The food store. Asking her to go food shopping is like asking me to run a load of wash. Where's the detergent? How much do I put in? What temperature should that water be at? is replaced with Where's cumin? What brand yogurt do you always get? I can't find the rice cakes!!! Yup... the food store is totally my domain.
I absolutely LOVE the food store. Like, too much. It's not even a chore to me. The key to having a successful food run? Be prepared. Plan out all your meals. And... have a list, organized by where everything is in the store. You'll be in and out in no time.
 When I'm in a rush and don't plan out our meals for the week, I end up wasting so much more time, energy, and money. I end up taking multiple trips to the store, and usually right after work when I'm already tired and the place is mobbed. Ugh. There is also way more caving into the we'll just do take-out throughout the week. And let's be honest... way less healthier choices. Because you better believe if I need to go out to the food store multiple times a week, I'll be rewarding myself with a pint of this or a package of that.
My mom was the QUEEN of food planning. She'd study those grocery store circulars, plan out all her meals for the week, and would always stick to that shopping list (unless that absolutely adorabe little son of hers somehow convinced her to get him a treat, of course). I guess all those weeks watching her rubbed off on me... and now I get to do the same for my family.
Oh, and don't mind the little pumpkin feet in the photo below. Creating shopping lists now include a baby in one arm. And that, my friends, is the BEST way to create a shopping list 🙂
 While most people are absolutely obsessed with pumpkin everything this time of year, I'm all about apples. Don't get me wrong, I'm not anti-pumpkin. For proof, see Exhibit-A below... Olivia had her very first pumpkin picking experience a couple weeks ago! But when it comes time to flavors I love, bring on 'da apple.
 We all have those nostalgic meals our moms made us, don't we? One of mine is Pork Chops, Apple Sauce, and Noodles. Man, I loved pork chop night. And this is my updated version (and, sorry mom... better version) of your pork chop dinner.
Done in just about 30 minutes. Just 5 ingredients (okay, 6 if you include the garnish). Gluten free. And a whole lot of big, bold flavors. This Apple Cider Glazed Pork Tenderloin with Apple Noodles is totally my type of meal.
And let's not even talk about how much fun it is to spiralize apples. Instant noodles... but a whole lot more funner. That's right. Funner.


 Laundry. Food shopping. It might not be the most glamorous parts of the week, but simple chores like that have the amazing power to make a lasting positive impact on the little ones in our families. Join along with the Whirlpool® Every day, care™ mission, and know how all the little things you do on a daily basis add up to something greater. Check out this video…
Need More Pork In Yo' Life?
Cinnamon Chili Pork Panini with Avocado + Sweet Potato


Pork Belly Tacos with Anchi Chili Roasted Pineapple + Avocado

Cinnamon Chili Pork Lettuce Wraps with Apple Corn Salsa

Slow Roasted Pork Belly with Cider-Bacon Jam and Pickled Apple


 Legit. Look at what the finished recipe looks like. Super easy to read and a beautiful interface. LOVE.
 Here's a really cool feature. You can keep track of what you want to make and then add the ingredients you don't have on hand to your shopping list! It's as easy as looking at the recipe's ingredients, clicking on what you need to buy, and ta da... instant shopping list.
 On your What's Cookin' timeline, you can discover who's commenting and liking your recipes, as well as what all your friends are doing. Maybe they are making some sweet-looking nachos. Or they are baking a salted caramel apple pie (in which case you can conveniently invite yourself over to their house for dessert).
 When you want to explore some new recipes or food collections (or meet some new awesome fellow lovers of food), you can use the search function! Obviously, your first step should be to
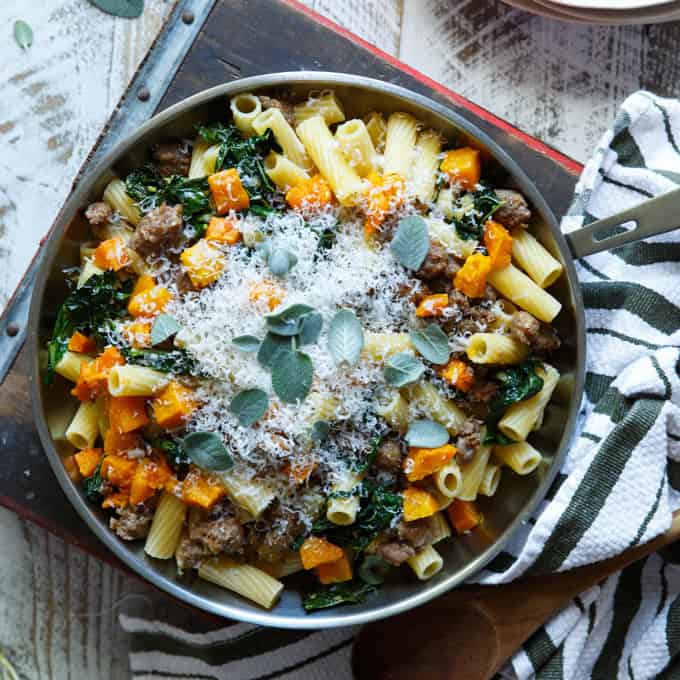
 Looking for a super simple weeknight dinner recipe this fall? This Pasta with Sausage, Roasted Butternut Squash, and Kale is packed with flavor!
  Holy cow this fall pasta dish is freaking amazing. I'm officially obsessed with roasted squash. It's SO easy and SO good. And although I'm bummed summer is totally gone (it suddently got crazy cold this week here in NY), I'm pumped for squash season.
 Let's talk


 Guys, I am SO pumped. Today's an exciting day. One of my fellow dude food blog wolfpack buddies is very soon expecting his first baby! I couldn't be happier for you, David (and Laura)!
 I know David is going to be up all hours of the day (and possibly night) chilling with his little man. He's gonna want to soak in every moment as a new little family, but I also know David is all about big flavors. So he's gonna be needing grub like these creative garlic knots that only takes a couple minutes of prep and can be done in under 20 minutes... and fills him up big time (because who knows when you'll remember or actually have the chance to eat again).


 This super-decadent, fool-proof Chocolate Brownie Peanut Butter Cup Trifle is the epitome of flavor overload! Serve it up in individual dessert glasses or one big bowl family-style.


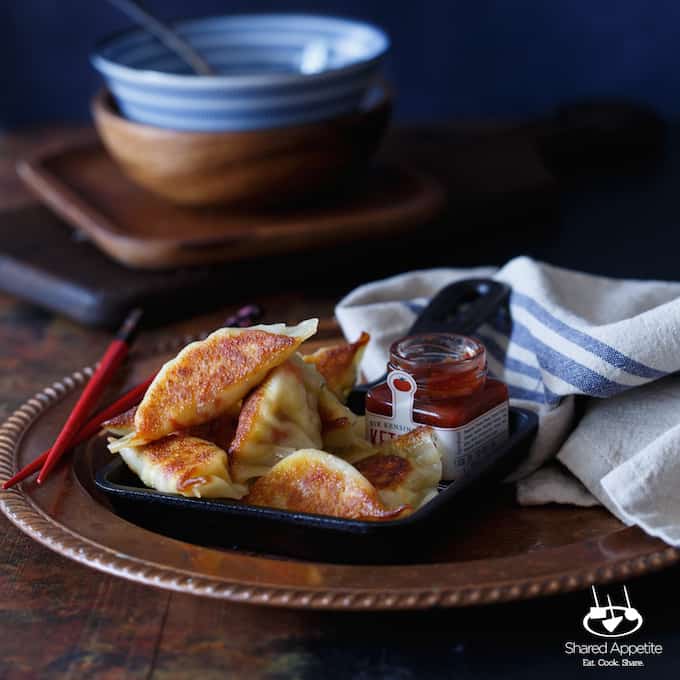
 Looking for a creative breakfast recipe that can help stretch those last few eggs in the fridge? Boom... Southwest Omelette Breakfast Wontons!
  In the Shared Appetite household, there are always a few staple ingredients lying around (besides way too many snack foods)...


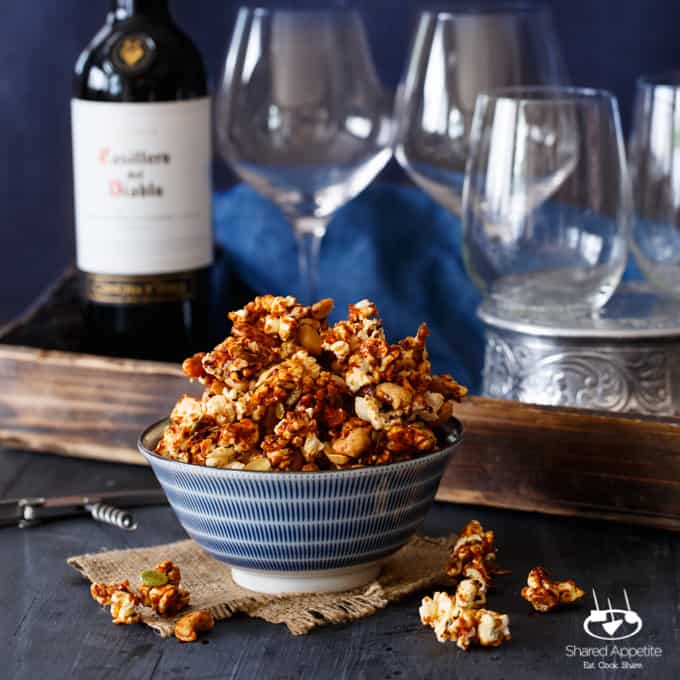
 Looking for an easy enteratining creative party snack to serve up at your next get together? How about some Honey Gochujang Popcorn Clusters!
 Don't know about gochujang? It's basically the Korean answer to Sriracha. It's way thicker though, and has a nice fermented flavor to it. I love making spicy aioli with it, and I use it wherever hot sauce is called for in cooking. Try it... you won't be disappointed.
 Of course, no adult costume party is complete without something to wash down all that food with. Pumpkin beer is an obvious choice. But I'm totally not a beer person. I'm all about wine, though. And what better wine to serve on Halloween than a deep red Diablo wine.


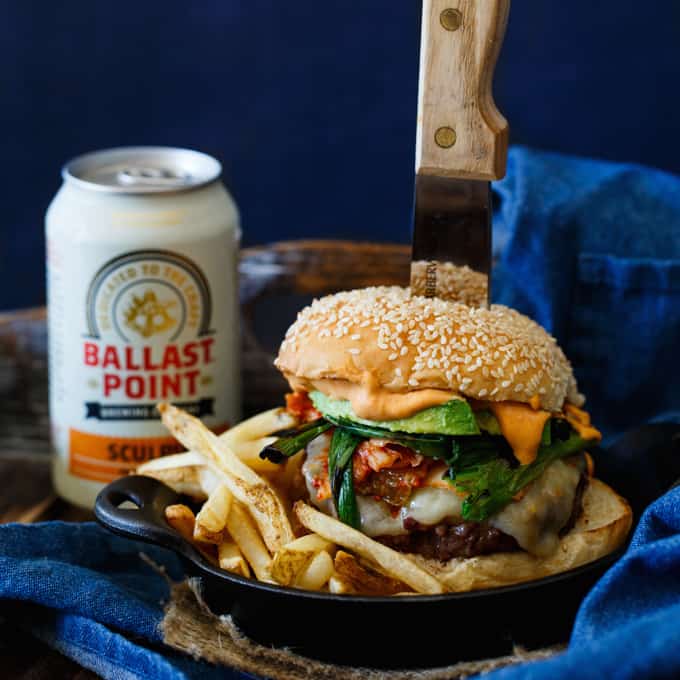
 Done in under 45 minutes, this quick and easy Spicy Korean Kimchi Ramen with pork belly, poached egg, and scallion is beyond legit!
  You know when someone says something is spicy, and then you're like... uhm, yea not at all. This is not one of those times. This is SPICY. In the best way possible. It's not going to burn your face off (it's a flavorful spicy), but it gives me a runny nose every time... truly spicy food always makes my nose run for some reason.


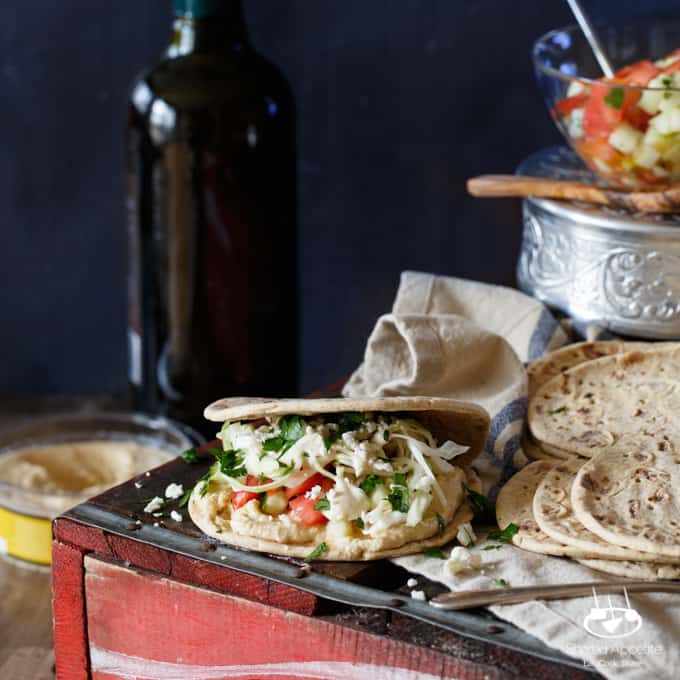
 Give your snacking a major flavor upgrade with these Healthy Mini Vegetarian Greek Sliders with Hummus, Israeli Salad, Pickled Cabbage, and Tahini Sauce!


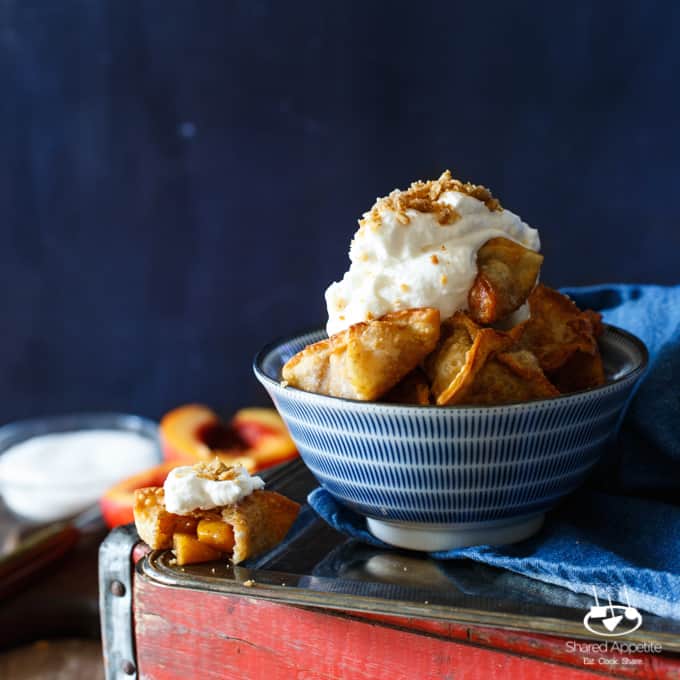
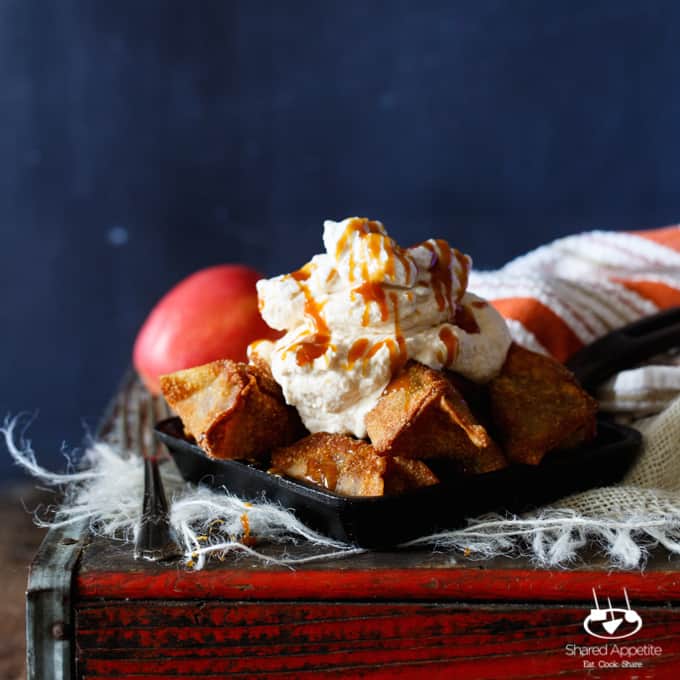
 These little creative wontons have all the flavor of peach cobbler, crammed into bite-sized (or two bites if you have a normal size mouth unlike me, I guess) bundles of joy.
 I'm not going to lie and say making these wontons are a super quick and easy process. But the work is well worth the result. How impressed are your family and friends going to be when they find out you made Peach Cobbler WONTONS?!


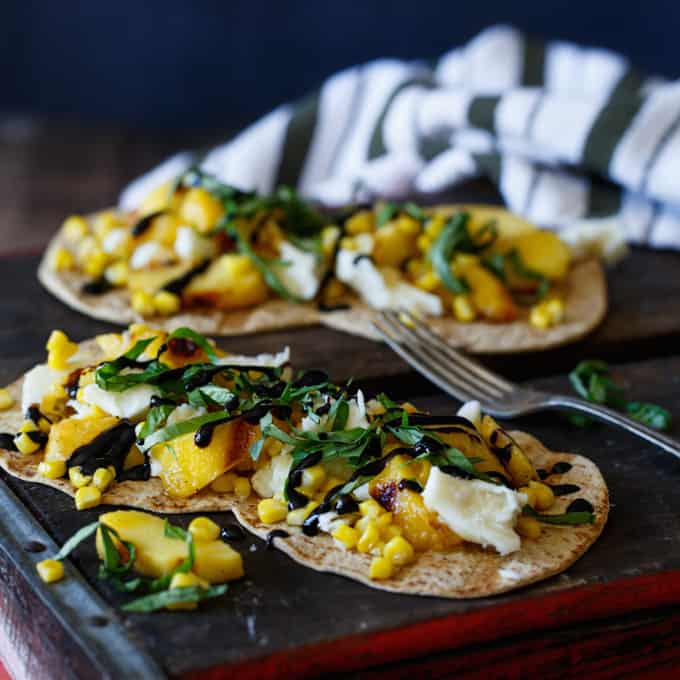
 Looking for some creative crostini to add to your party menu? These Mexican Street Corn and Avocado Crostini are the perfect little summer appetizers!
 Asheley is always stuck being my recipe tester. I know... it's such a hard job. Poor her.
 And if you want bonus points when serving up these Mexican Street Corn and Avocado Crostini, make sure you're serving up some fermented grape juice. Wine. Serve wine.


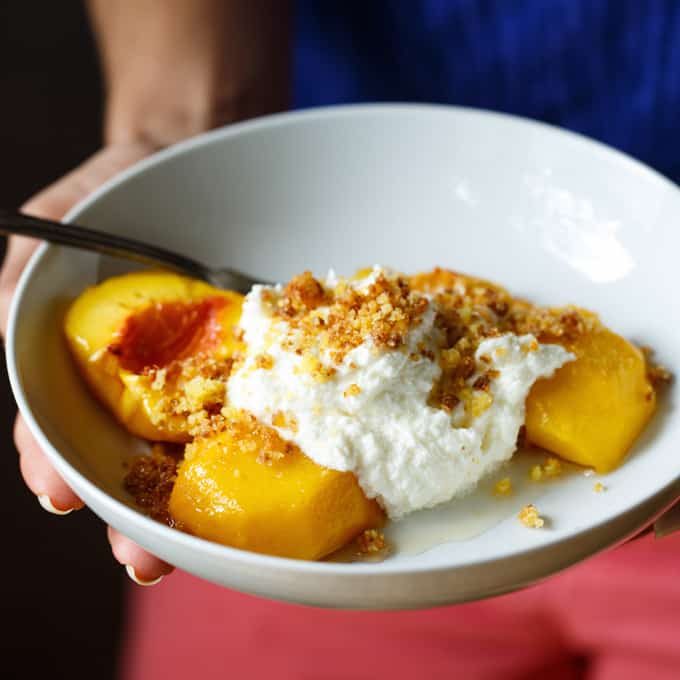
 Because really, this creative peach dessert, as weird as it may sound, is freaking ridiculously legit. And I want Olivia to experience awesome flavor like this.
 Just look at our little baby girl. Doesn't it look like she LOVED picking these peaches? Okay, well she's like 2 months old and she was a little cranky. But it was a wee-bit hot, she was hungry, and mommy put a hat on her for the first time. Wouldn't you cry?
 This recipe has been adapted from

 Your friends and family will love you just a little bit more when you make them these four ingredient S'mores Ice Cream Sandwiches.


 Question: What should I make this week for dinner? Answer: Crab Cake Sandwich with Mango Bacon Aioli!
  Trying to cook dinner at home is a little more tricky now that we have Olivia in the mix. There is that little itty-bitty window of time to cook and inhale our food, because of course our little girl's fussiest time of day always has to coincide when mommy and daddy wants to eat. The struggle is real.
 Oh... you're worried about eating raw eggs? Me too. I'm no Rocky Balboa, so raw eggs aren't part of my usual food intake routine.
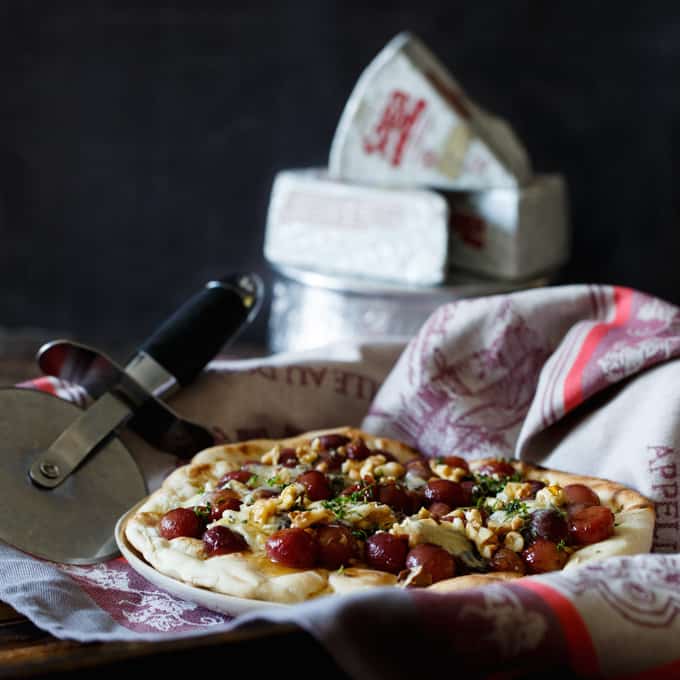
 Uncork some wine, set up the patio furniture, and enjoy the rest of your summer with this Roasted Grape and Blue Cheese Pizza with Honey, Walnut, and Thyme.
 Why roasted grapes? Simple.
 I have a confession. I'm not a big blue cheese fan. There, I said it. Judge me quietly as you will.


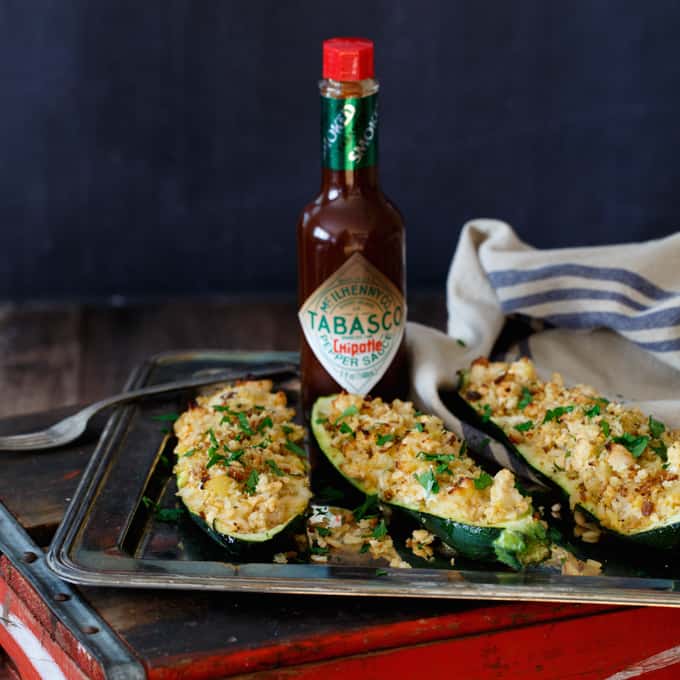
 Anyone else have a crazy amount of zucchini this time of year? Get excited about your bountiful squash "problem" and make these Fried Zucchini with Chipotle Honey Dipping Sauce.
 We made it! The final day of the #TABASCO10 Challenge. 5 short days, 5 original recipes, and only 10 ingredients to work with (minus fennel, since it's icky).


 Looking to up your grilling hot dog cred? These Pineapple, Bacon, and Teriyaki Hot Dogs are packed with flavor, only have 6 ingredients, and are done in under 20 minutes.
 There's this hot dog joint in the city called Crif Dogs that Asheley and I totally love. They have all these creative hot dog flavors, one of which is called the Tsunami Dog. And this is the recreation of that glorious, glorious hot dog.


 Hey, have you been following along with me this week as I participate in the TABASCO 10 Challenge?


 If you've been following along this week, you know that this is the 3rd of 5 recipes for the super awesome TABASCO 10 Challenge. #humpday
 This honey glazed stuffed chicken is totally going to become a weeknight staple in our house.


 Done in under 10 minutes, these Huevos Rancheros Sausage Breakfast Tacos are the perfect reason to wake up excited on weekdays.
  Growing up, I was always a bacon guy. My mom never ever made sausage (probably my picky-eater-father's fault) . Whenever I went out to breakfast and the server asked sausage or bacon... I didn't understand the question. Doesn't everyone prefer bacon?


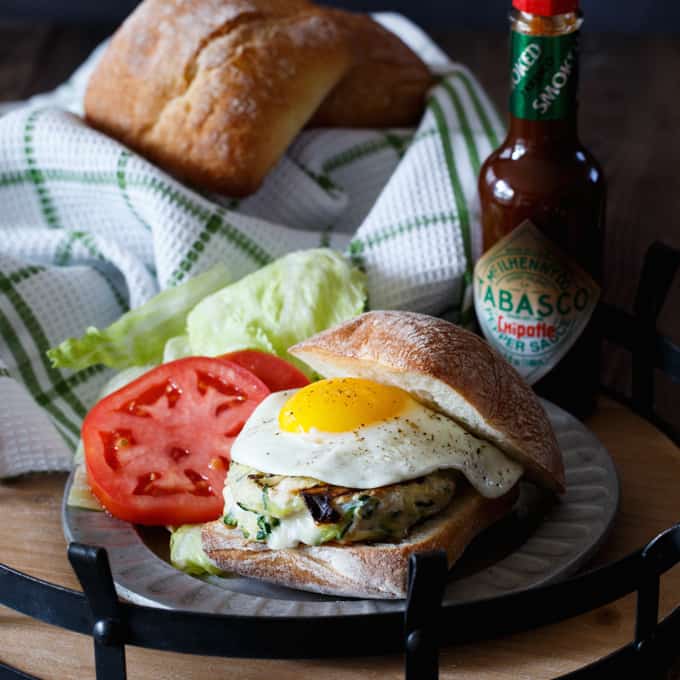
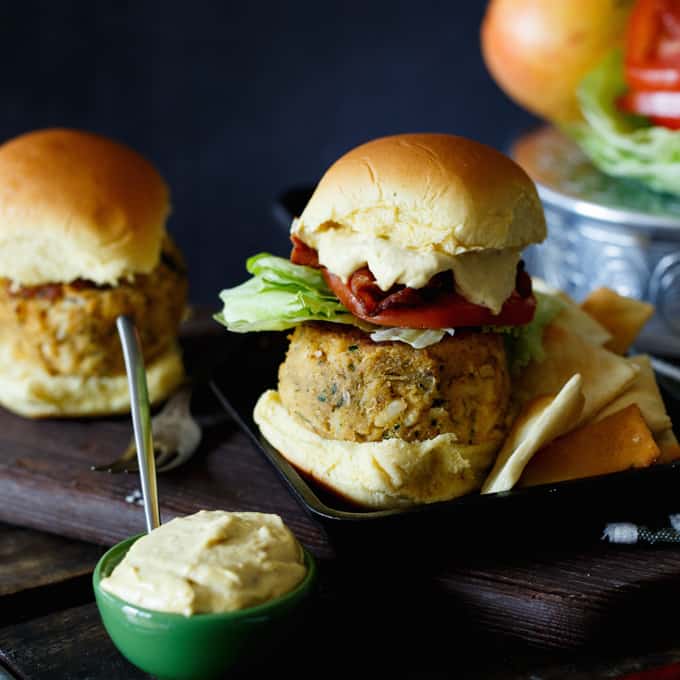
 This creative chicken burger is pretty freaking awesome. I'm definitely not one to jump up and down for a chicken burger normally (yawn... give me the beef), but these are really flavorful, juicy, and moist thanks to the additon of shredded zucchini, mozzarella, and Chipotle TABASCO into the patty.

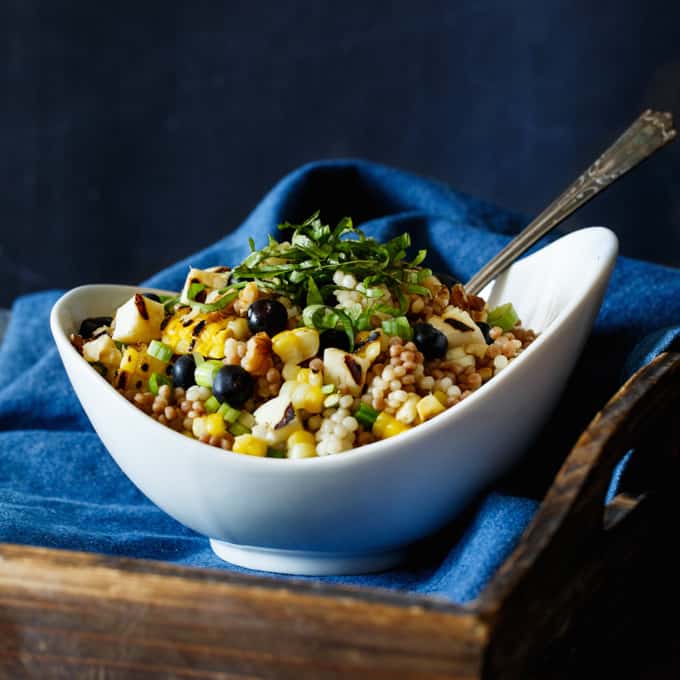
 Looking for an epic creative summer side dish? Boom. This is it... Corn, Blueberry, and Halloumi Grain Salad with Walnut and Basil will be the hit of any party!
 Are you a little intrigued by the corn and blueberry thing together? You should be. It's a magical, epic combination that I'm currently obsessed with. Asheley and I experienced it for the first time in a pasta dish at an awesome


 I can smell the campire now with this super easy Two Ingredient Toasted Marshmallow Ice Cream! Perfect for summer or whenever the s'mores craving hits!


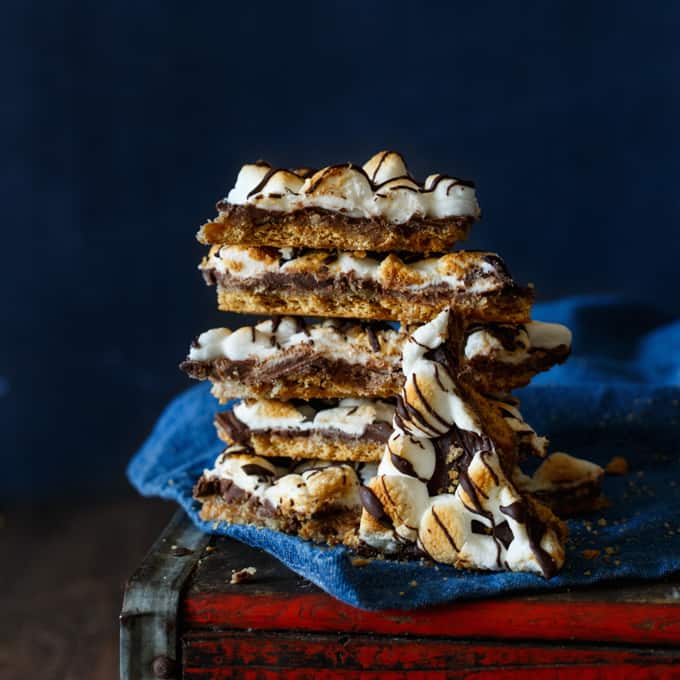
 Skip the camfire and get your s'mores fix with this super easy entertaining 5-ingredient summer dessert for S'mores Graham Cracker Toffee Bark!
  And listen, no one needs to know if you decide to keep all this bark for yourself and not bring it to that party. I totally get it 😉
 Want to make this super easy


 Meet Olivia. 7.1.15. 9 pounds - 5 ounces. 21 inches.
 Side note. People who do newborn photography... big props to you. It's SO different than photographing food and engagements/weddings! I thought it would be easy to scrunch her up into a pose. Nope. I thought she would sleep easily and cooperate fully when I wanted to photograph her. Nope.
 --------------------------------
 Top Left: One of the cuter sonogram photos of me! (let's be honest... a lot of the sono photos look like I'm a baby alien). NOT flattering. This one I at least look like a little gummy bear 🙂
 Daddy says I make faces like he did when he was a baby. His mommy (my Mima!) sent me this photo of him... look at the side-by-side comparison! I'm definitely a daddy's girl!
 LOVE bathtime! I'm a happy baby sitting in my little tub. Daddy is in charge of drying me off after... he does a pretty good job.
 It was daddy's birthday a few weeks ago! We're not going to talk about the several hours I screamed my face off while he was trying to enjoy his birthday dinner. I apologized about that... I was just a really cranky girl and was very gassy. But by the time cake came out, I calmed down and Mima was able to snap a great family moment. Don't we all look happy?!
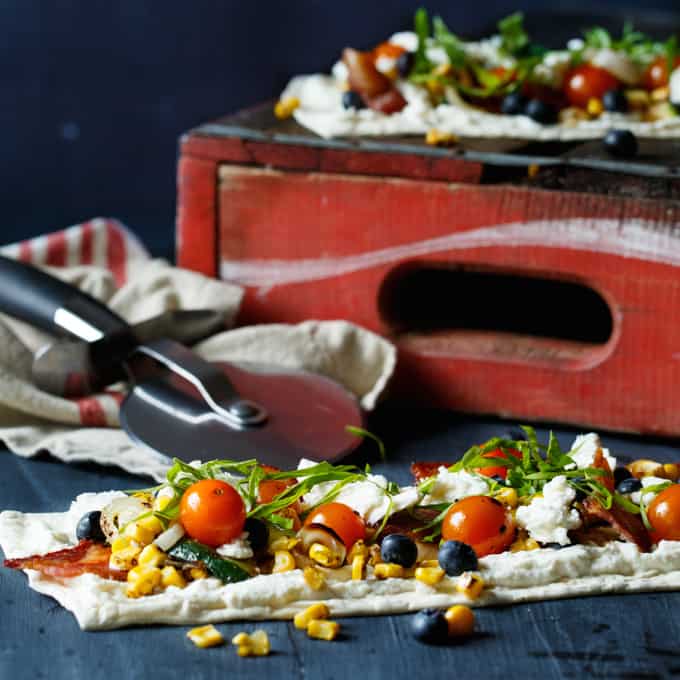
 Looking for a creative weeknight dinner that's bold on flavor and light on the waist? Boom. Grilled Summer Vegetable Flatbread with Blueberry, Bacon, and Lemon Ricotta.
 So if you are thinking... Chris, this sounds amazing except for the blueberries, you need to just trust me already and try it. I've been adding blueberries to savory dishes a bunch lately, and it's pretty darn extraordinary. I learned the tip after having an amazing pasta dish with corn and blueberry at


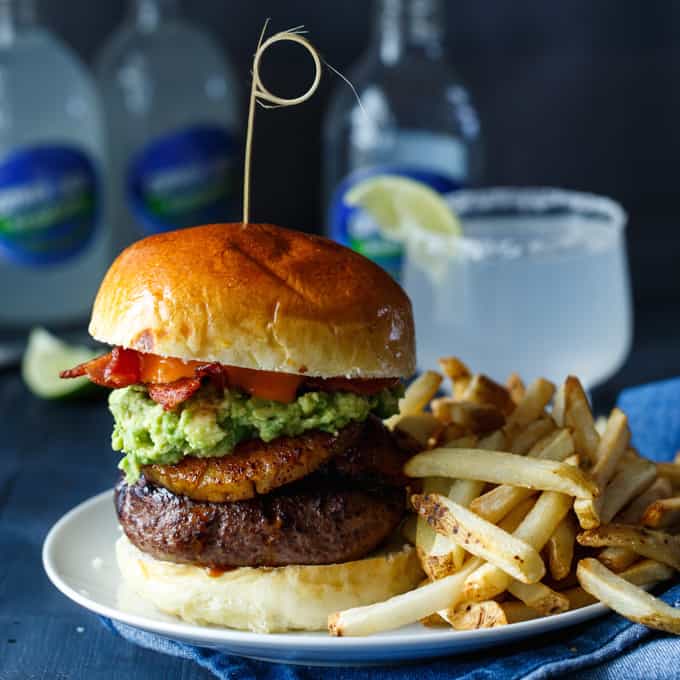
 Time to bump up that boring backyard bbq menu with a creative burger to make your party epic? Boom... Spicy Roasted Pineapple and Avocado Bacon Burger!
  Now you can feel free to cook your burger however you darn well please. That's your call and I'm not gonna mess with your burger cooking method. We all have our ways.
 And hey, if you want to really embrace summer, you need a margarita in that hand. No, no... put that blender away. Nope, no shaker necessary. All you have to do is reach into the fridge and grab some ready-to-serve, hand-crafted
  Follow Cayman Jack:


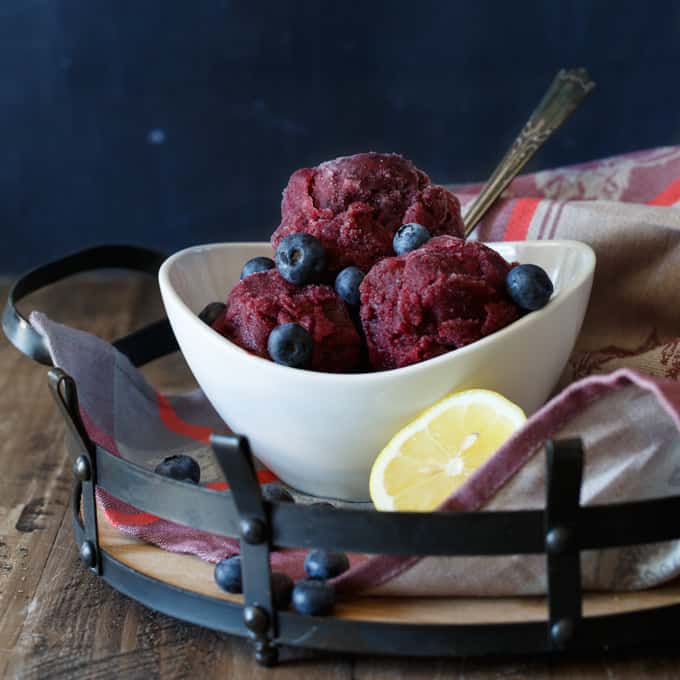
 This Blueberry Margarita Sorbet is a refreshing summer dessert treat with an adult twist. If you prefer, you may omit the tequila and salt for plain Blueberry Sorbet.


 Roasted Corn. Crumbled Bacon. Cotija Cheese. Fresh Chives. And of course, that spicy Sriracha Mayo. Hello beautiful, get in my belly.
 I'm totally digging these

 Cool down this summer with this refreshing Tropical Pineapple Coconut Sangria! It's an instant party in a pitcher!

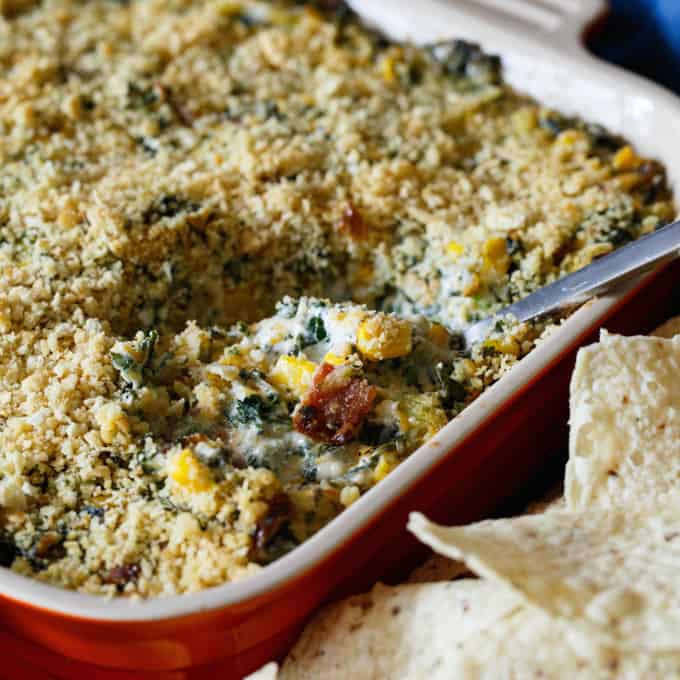
 This Southwest Kale, Corn, and Bacon Dip will definitely bring an explosion of flavor to your party! Just 10 minutes of super easy prep!
  Are you shocked I went with a southwest spin? I know, it's so unlike me. That was sarcasm. I love southwest flavors. Heck to the yes.


 Fire up the grill and throw a legendary backyard BBQ with these Bacon Wrapped Brats with Cheddar Beer Sauce and Sriracha!
  I'm pretty much a fan of anything that is served up in a bun. It's the ultimate party food... no utensils required. And brats are perfect for pretty much any summer party occasion... cook outs, picnics, family dinners, BBQs.


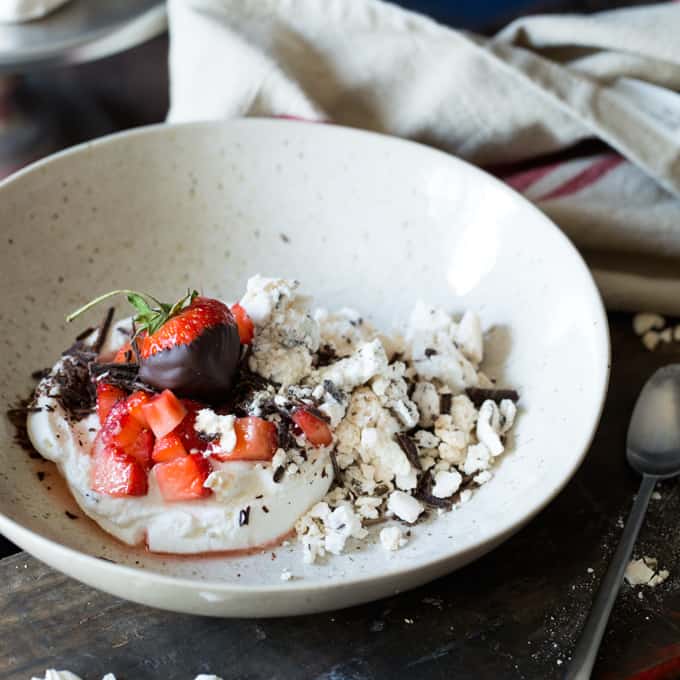
 Need an easy entertaining summer dessert that can completely be made ahead of time? Boom... this Chocolate Covered Strawberry Eton Mess is your answer.
  So with the traditional Eton Mess, you usually mix together strawberries, broken meringues, and whipped cream into one big mess of a dessert.
 Guys. Grilled peaches? You need them in your life. Seriously.
 So can I be honest? With our baby on the way, I've gained quite a bit of pregnancy "sympathy weight". Not good. The button on my jeans is currently holding on for dear life.

 And sure, there's a time and place for a purist burger. I'm totally down with that. But this isn't one of those times. I mean, I'll grill up a plain cheeseburger for my dad. That's how I roll. Give the guys what he wants and make him happy.
 Of course, anytime a dude's got company coming over to celebrate a special occasion, he's gotta look good. And that's where Schick Hydro® comes in. With their Schick Hydro® 5 Groomer, you better believe I'm looking fine... as fine as a guy that gained a healthy amount of "sympathy weight" during Asheley's pregnancy that is. Oops.


 Cool down with hot chocolate... frozen hot chocolate, that is! This thick and creamy Frozen Mexican Hot Chocolate is spiked with cinnamon and cayenne pepper for an ultimate summer drink!
 All that had nothing to do with this Frozen Mexican Hot Chocolate. Sorry. I just wanted to share.
 You can grab the recipe for this

 We are coming up on our first summer in our new home and I couldn't be more excited! Well, technically we moved in during the middle of summer last year, but I'm not counting that considering it was spent moving and unpacking an absurd amount of boxes (like really, how do 2 people amass so much stuff?!).


 Dinner for Breakfast? Heck yes, especially if it's one of these Bacon, Egg, and Cheese Breakfast Burgers! And easy meal ready in under 20 minutes!
  Did you know that Johnsonville® is bringing some serious flavor in the burger department? Yea, I have to admit. I didn't either. That is... until I grilled up two of their Cheddar Cheese and Bacon

 Follow Johnsonville® on